How to control the available choices of a choice list in a ServiceNow form

22 Feb

In this blog post I show how one can control the list of available choices in a ServiceNow form depending on the current choice of a record.

Setting the context

For a practical illustration, we will be controlling the list of available choices of the State field of an incident.

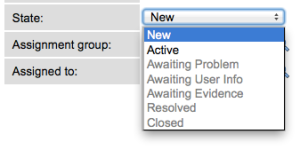
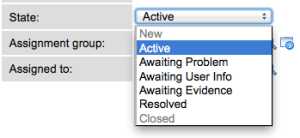
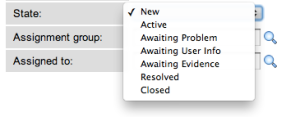
In the out of the box installation of ServiceNow (for example on demo.service-now.com), an Incident can have the following states:

Screen Shot 2013-01-28 at 14.48.50

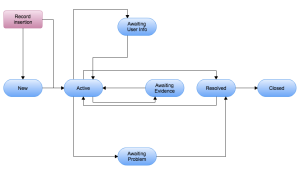
We will be controlling the list of choices for the incident state as per the following state diagram:

Screen Shot 2013-01-28 at 15.05.07

As per the diagram, we can only move into the Active state either from the New state or if the incident is just being created.

Step 1: creating a states transition table

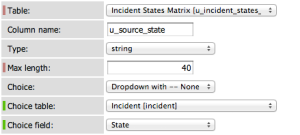
In order to make the solution as dynamic as possible we create a new table in ServiceNow named incident_state_matrix having two columns (source_state, destination_state).

This table has two choice fields ‘Source State’ and ‘Destination State’ that allow inserting valid transitions. These fields are choice lists that are are based on the incident states from the Incident [incident] table as per the screenshot below.

Screen Shot 2013-02-22 at 15.29.50

In this table we insert rows that represent the allowed transitions in the above diagram. Below is a screenshot of the populated table:

Screen Shot 2013-02-22 at 15.37.31

Step 2: Business rule that propagates the allowed states of an incident to the client browser

Create the following business rule:

  • Name: Allowed Incident States
  • Table: Incident
  • When: display
  • Active: true

In the script section paste the following:

getAllowedStates();

function getAllowedStates() {
  var current_state = current.state;
  var ismgr = new GlideRecord('u_incident_states_matrix');
  ismgr.addQuery('u_source_state', current_state);
  ismgr.query();

  var allowed_states = [];
  var index = 0;

  while (ismgr.next()) {
    allowed_states[index++] = ismgr.u_destination_state.toString();
  }

  g_scratchpad.allowed_states = allowed_states;
}

What is the above business rule does is generate an array of allowable states that is sends to the client browser as a scratchpad object.

A client script on the client side will have to process the propagated array and control the list of selectable choices.

Step 3: Create a helper UI Script that facilitates enabling/disabling choice list options

Note: this script is inspired from a post that appeared on the SNCGuru blog at http://www.servicenowguru.com/scripting/client-scripts-scripting/removing-disabling-choice-list-options/

Create the following UI Script:

  • Name:  DisableEnableOptions
  • Active: true
  • Global: true

Paste the following script:

function disableAllOptions(fieldName) {
  fieldName = g_form.removeCurrentPrefix(fieldName);
  var control = g_form.getControl(fieldName);
  if (control && !control.options) {
    var name = 'sys_select.' + this.tableName + '.' + fieldName;
    control = gel(name);
  }
  if (!control)
    return;

  if (!control.options)
    return;

  var options = control.options;
  for (var i = 0; i < options.length; i++) {
    var option = options[i];
    control.options[i].disabled = 'true';
  }
}

function disableOption(fieldName, choiceValue) {
  fieldName = g_form.removeCurrentPrefix(fieldName);
  var control = g_form.getControl(fieldName);
  if (control && !control.options) {
    var name = 'sys_select.' + this.tableName + '.' + fieldName;
    control = gel(name);
  }
  if (!control)
    return;

  if (!control.options)
    return;

  var options = control.options;
  for (var i = 0; i < options.length; i++) {
    var option = options[i];
    if (option.value == choiceValue) {
      control.options[i].disabled = 'true';
      break;
    }
  }
}

function enableOption(fieldName, choiceValue) {
  fieldName = g_form.removeCurrentPrefix(fieldName);
  var control = g_form.getControl(fieldName);
  if (control && !control.options) {
    var name = 'sys_select.' + this.tableName + '.' + fieldName;
    control = gel(name);
  }
  if (!control)
    return;

  if (!control.options)
    return;

  var options = control.options;
  for (var i = 0; i < options.length; i++) {
    var option = options[i];
    if (option.value == choiceValue) {
      control.options[i].disabled = '';
      break;
    }
  }
}

Step 4: Client script that controls the list of choices

Create the following client script:

  • Name: Allowed Incident States
  • Active: true
  • Global: true
  • Type: onLoad
  • Table: Incident

In the script section paste the following:

function onLoad() {
  try {
    var current_state = g_form.getValue('state');
    disableAllOptions('state');
    enableOption('state', current_state);
    var allowed_states = g_scratchpad.allowed_states;
    var nb_states = allowed_states.length;
    for (var index = 0; index < nb_states; index++) {
      enableOption('state', allowed_states[index]);
    }
  }
  catch (err) {
    jslog(err.message);
  }
}

Step 5: Business rule that checks if a state is allowed before saving a record

Create the following business rule:

  • Name: Check If Incident State Allowed
  • Table: Incident
  • Active: true
  • When: before
  • Insert: true
  • Update: true

Paste the following script:

</pre>
checkIfStateAllowed();

function checkIfStateAllowed() {
 var bad_state = true;
 //If the record is being inserted then previous.state is null
var previous_state = previous.state.toString() == 0 ? 1 : previous.state.toString();
 var current_state = current.state.toString();

 if (previous_state != current_state) {

 var ismgr = new GlideRecord('u_incident_states_matrix');
 ismgr.addQuery('u_source_state', previous_state);
 ismgr.query();

 while (ismgr.next()) {
 if (current_state == ismgr.u_destination_state.toString()) {
 bad_state = false;
 break;
 }
 }

 if (bad_state == true) {
 //If current.state did not match any destination state then we have to abort
 gs.addErrorMessage('Incident State Not Allowed');
 current.setAbortAction(true);
 }
 }
}
<pre>

Testing

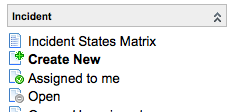
To test the solution create a new incident as per the below screenshot:

Screen Shot 2013-01-28 at 16.05.42

On the form you will notice that only the New and Active states are available:

Screen Shot 2013-01-28 at 16.09.13

If  we set the incident state to Active and save the form then the list of available choices changes:

Screen Shot 2013-01-28 at 16.11.06

I hope this blog post has been useful for you.
Agile Principles, Patterns and Practices in C# – Summary of chapter 3 (Planning).

12 Feb

Initial Exploration

At the start of the project, developers and customers get together to discuss and identify as much features as possible about the system to be built.

Each feature is divided into one of multiple user stories.

Developers can then estimate how much time each story would take. Each story will then have a rank (usually number of story points).

A story must not be too small nor too big.

Every week the sum of the points of the completed stories are summed. This sum is a metric known as velocity.

After a few weeks an average velocity can be calculated and use to estimate the remaining time needed to complete the project. Continue reading

Agile Principles, Patterns and Practices in C# – Summary of chapter 2 (Overview of Extreme Programming).

9 Feb

XP Practices

  • Whole Team: Customer business representative should work closely with development team. The best option is to be in the same room as the developers.
  • User stories: it’s an ongoing conversation with the customer about a requirement.
  • Short cycles: Iteration Plan is a two week cycle, Release Plan is a six iterations cycle. During an iteration requirements don’t change. During a release, requirements may change but must stay within budget fixed by developers for the release.
  • Acceptance Tests: Scriptable tests that verfiy the user stories.
  • Pair Programming: Code is designed and written by programmers working in pairs.
  • Test Driven Development: Unit tests are written before the code that makes them pass is written.
  • Collective Ownership: All team members should be familiar with and work on the whole codebase.
  • Continuous Integration: Developers integrate their changes many times per day. After every code checkin, tests are run and failures fixed immediately.
  • Sustainable Pace: Teams should not rush themselves at the beginning of development but rather maintain a sustainable pace throughout the whole development period.
  • Open Workspace: Working in a open space allows developers to intensely communicate.
  • The Planning Game: At the beginning of an iteration, the developers give the customer a budget and the latter chooses the user stories that fit that budget.
  • Simple Design: XP team makes the simplest software designs that fit the requirements.
  • Refactoring: The structure of the code degrades with time. Refactoring, the act of doing tiny changes to the code to make it better without altering its function, is done continuously by an XP team.
  • Metaphor: XP teams have a system of names and a vision for the system being built.

Agile Principles, Patterns and Practices in C# – Chapter 1 summary.

6 Feb

Agile Values

Manifesto for Agile Software Development

We are uncovering better ways of developing
software by doing it and helping others do it.
Through this work we have come to value:
Individuals and interactions over processes and tools
Working software over comprehensive documentation
Customer collaboration over contract negotiation
Responding to change over following a plan
That is, while there is value in the items on
the right, we value the items on the left more.

The people in a team are the most important factor for success. Complex processes and non communicating people may lead a project to failure.

Always start with using free (open source or free of charge) tools until they prove their limitations before buying extremely expensive and complex tooling.

Software without documentation detailing its design and architecture and how to use it will be a disaster.

However very detailed documentation, besides being time consuming to maintain, can go out of sync and renders people lost.

Document the rationale and structure of the software in brief (couple dozen pages at most) and high-level manner.

Train new team members by close interactions with older team members and reading the code.

1st Law of Documentation: produce no document unless its need is immediate and significant.

Customer feedback on a regular and frequent basis is key to success.

The contract with the customer should be about the details of the collaboration with them, not about scope and schedule.

Plan minimally: exact & detailed plan for next week, rough plan for the upcoming 3 months, very crude & succinct plan for 1 year milestone.

Agile Principles

1) Top priority is to gain customer satisfaction through early and frequent deliveries of the software.

2) Requirement changes are always welcome even if in the late stages of the software development. Agile teams keep their software structure flexible enough to adapt to changing requirements.

3) Deliver software frequently.

4) Business people and developers need to work together very closely when developing the software.

5) Keep your people motivated and build projects around them.

6) The most effective communication mean is face-to-face conversations between team members. Documents are produced only when needed.

7) Working software is the primary measure of progress.

8 ) The development rate should be sustainable for the whole duration of the project.

9) Developers should commit only high quality code. Messy or enhanceable code should be improved before making their way into the software.

10) Keep the software simple.

11) Agile teams are self organizing.

12) Agile teams continuously change their organization and working habits in order to adapt to the changing environment.

Art of Application Performance Testing book

5 Feb

I just finished reading the Art of Application performance Testing book (O’reilly publishers). It is a good introductory book about how to performance test software systems & applications. Although it does not go into very technical details and in-depth techniques on how to performance test different software technologies, it does provide the necessary information for the reader to understand what is performance testing in general.

Recommended reading for every performance engineer and would be interresting for software developers, architects & technical consultants.

Importance of Vibration Reduction (VR) technology in Lenses

25 Jan

VR technology is a useful addition to recent photographic lenses.

In a nutshell, VR technology consists of moveable elements inside a lens that are controlled by sensors (gyroscopic motors usually) that detect movements (vertical / horizontal / angular shakes) of the camera body and compensate for it.

This prevents blurring from appearing on the image produced by the photographic sensor when using slow shutter speeds.

VR technology is effective for shutter speeds that are below the security speed (security shutter speed is usually considered to be 1/focal length – so for a focal length of 35mm the security shutter speed is 1/35th of a second and for a focal length of 50mm the security shutter speed os 1/50th of a second).

When shooting with shutter speeds below this security value blurring is inevitable. For example even a very experienced and steady photographer cannot shoot with speeds below 1/15th of a second (for a focal length of 50mm for example) without getting blurred images.

VR technology allows shooting with speeds between 1/4th and 1/15th of a second without causing (excessive) blur – i.e. with VR images produced at these speeds are still usable.

Below are sample images I took with the following conditions:

  • f = 50mm, F5.6, 1/10th sec, with VR.
  • f = 50mm, F5.6, 1/4th sec, with VR.
  • f = 50mm, F5.6, 1/4th sec, without VR.

It can clearly be seen that at 1/4th of a second blurring is inevitable without VR. With VR the image is not perfect in terms of sharpness but is still usable.

Nikon SB-400 Flash plus Stofen OM-400 diffuser Test

13 Oct

Today I received a package containing a brand new nikon SB-400 flash unit and a Stofen OM-400 flash diffuser specifically crafted for the SB-400.

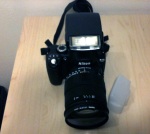
Below are pictures of the flash unit mounted on my Nikon D60 DSLR equipped with a Sigma 18-200 mm zoom lens.

The above pictures show the SB-400 mounted on the camera, flipped vertically and horizontally along with a diffuser mounted on it.

The importance of the SB-400 (besides being much better than the built-in flash) is that it flips 90 degrees (faces the ceiling) and therefore can be used as a bounce flash.

The Stofen OM-400 acts as a diffuser for the SB-400 and can be used to soften and diffuse the light produced by the SB-400.

You can see above four different pictures of the same subject that I took with my Nikon D60 with the SB400 mounted on it.

The figures above are ordered with the following order:

– SB-400 facing subject – no OM-400 diffuser.

– SB-400 facing subject – OM-400 covering flash.

– SB-400 facing ceiling – OM-400 not used.

– SB-400 facing ceiling – OM-400 covering flash.

We can clearly see that the in the first figure the subject is completely overblown. In the second figure the diffuser helps reduce the flare a little bit.

In figure three we can clearly see the importance of using bounce flash: the over exposure of the subject is reduced to the maximum, however we can see that some shadow areas start to appear.

In figure four I use the bounce flash plus the diffuser. In my opinion this is the best photo amongst the four. Although some areas are over exposed than in figure 3, the overall look of the photo is better. The subject I was shooting is a reflexive surface so this is the best I could get while shooting with the SB-400 mounted on the DSLR and being 2 meters away.

Next time I will be showing some photos where I show that a diffuser is very effective in eliminating shadow casts.

Welcome to the iPhone era…

16 Sep

I just acquired an iPhone 3GS. Amazing piece of cutting edge technology. All my other smartphones (Nokia, BlackBerry…) look like crap compared to the iPhone.

Apple rocks, and I’ll sure be buying their iTablet (if the rumor about this is true).

Design patterns videos.

12 Aug

I am going through the great video tutorials about design patterns under http://sourcemaking.com/design-patterns-video-tutorial.

Very instructive and much better than a plain book.

Getting started with JFace TableViewer in Eclipse RCP.

31 Jul

Hello,

Today, I’m gonna blog about using JFace TableViewer widget in an Eclipse RCP application.

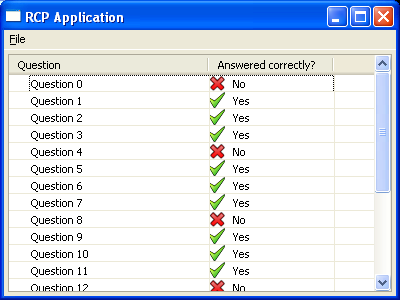
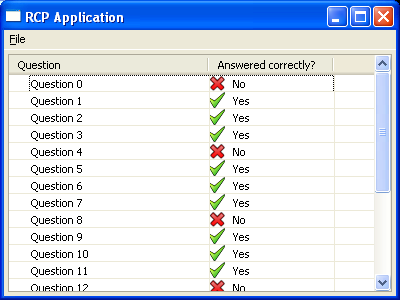
I am going to provide step by step instructions for building the following simple RCP application:

Target RCP app

It represents part of a larger application that I am building. The application is meant to be a Quiz Taking engine. After a user takes a quiz their results will be displayed in a table like the one above.

Let get started!

In your Eclipse IDE create a new Rich Client Application plugin projet based on the « RCP application with a view » template that ships with Eclipse IDE (I assume you know how to do that!). Name that project TableViewerExample.

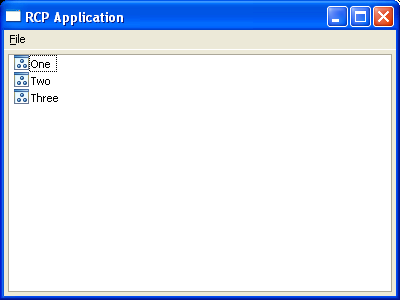
Go ahead and launch that sample application.

1

Humm, nice but not so interresting to our eyes.

Let’s modify this application in order to host our quiz results table.

First let’s create our model objects upon which our TableViewer will act to display GUI elements.

Our model will be very simple: We will have a class Question that represents a quiz question, a class Answer that represents the answer of the user to that question, and an AnswerList class that represents the list of answers the user gave for a quiz.

Below is the code of these classes. Pretty straigtforward isn’t it?

You can simple paste these classes into your project.


//Question.java

package tableviewersample;

public class Question {

private String description;

public Question(String description) {

this.description = description;

}

public String getDescription() {

return description;

}

public void setDescription(String description) {

this.description = description;

}

}

//Answer.java

package tableviewersample;

public class Answer {

private Question relatedQuestion;

private boolean answeredCorrectly;

public Answer(Question question, boolean status) {

this.relatedQuestion = question;

this.answeredCorrectly = status;

}

public boolean getAnsweredCorrectly() {

return answeredCorrectly;

}

public Question getRelatedQuestion() {

return relatedQuestion;

}

public void setAnsweredCorrectly(boolean answeredCorrectly) {

this.answeredCorrectly = answeredCorrectly;

}

public void setRelatedQuestion(Question relatedQuestion) {

this.relatedQuestion = relatedQuestion;

}

}

//AnswerList.java

package tableviewersample;

import java.util.ArrayList;

import java.util.List;

public class AnswerList {

private List<Answer> answerList;

public AnswerList() {

answerList = new ArrayList<Answer>();

}

public void addAnswer(Answer answer) {

answerList.add(answer);

}

public Object[] getAnswersAsArray() {

return answerList.toArray();

}

}


Next, we will have to modify our eclipse widgetry classes in order to display a table of answers.

Go ahead and open the file View.java that was autogenerated by Eclipse when you chose the RCP template.

First we will have to modify the createPartControl method in order to incorporate a table in our application.


public void createPartControl(Composite parent) {

createTable(parent); //1

viewer = new TableViewer(table); //2

viewer.setContentProvider(new ViewContentProvider());

viewer.setLabelProvider(new ViewLabelProvider());

viewer.setInput(getInitialInput()); //3

}


Lines marked //1, //2 and //3 are the important.

Below are details and explanations of what these lines and the related methods do.

In //1, we are calling a method that creates a SWT Table widget upon which our JFace TableViewer will be based (line //2).

Below is the createTable method:


private void createTable(Composite parent) {

table = new Table(parent, SWT.FULL_SELECTION | SWT.V_SCROLL);

table.setHeaderVisible(true);

table.setLinesVisible(true);

TableColumn col1 = new TableColumn(table, SWT.LEFT);

col1.setText("Question");

col1.setWidth(200);

TableColumn col2 = new TableColumn(table, SWT.LEFT);

col2.setText("Answered correctly?");

col2.setWidth(125);

}


It’s not difficult to understand: we create a Table widget, make its header row visible and create two columns one that refers to the question the answer is about and the second about the correctness of the answer.

Go ahead and copy that method in your View.java (don’t forget to create a private Table field in your View class!)

On line marked //3, we are modifying the initial input we are supplying our TableViewer with: instead of the simplistic « One, Two, Three » structure we got in the autogenerated code, we are going to put a more elaborate answer list.

What we are going to do is generate a fake answer list model in the method getInitialInput.


private Object getInitialInput() {

AnswerList answerList = new AnswerList();

for (int i = 0; i < 20; i++) {

Question question = new Question("Question " + i);

Answer answer = new Answer(question, i % 4 != 0 ? true : false);

answerList.addAnswer(answer);

}

return answerList;

}

 &#91;/sourcecode&#93;

What we are basically doing is creating a list of 20 answers corresponding each to a fake question and adding the to a list that will server as the initial input of our TableViewer widget.

We have now finished with the model and the GUI part.

We still have to adapt our controller logic for things to work: in that case, we have to adapt our content and label providers in order to corretly return the model data that should populate the TableViewer. If you don't know the basic concepts of content and label providers, I advise you to refer to the many articles found at <a href="http://www.eclipse.org">www.eclipse.org</a>.

Modify the getElements method of inner class ViewContentProvider to the following:


public Object[] getElements(Object parent) {

if (parent instanceof AnswerList) {

AnswerList answerList = (AnswerList) parent;

return answerList.getAnswersAsArray();

} else {

return null;

}

}


In a nutshell, we are returning our answerList as an array of Answer objects in conformance with the contract of the getElements methods for content providers.

Moving on to the label provider, modify the method of getColumnText of inner class ViewLabelProvider to the following:


public String getColumnText(Object obj, int index) {

String result = "";

if (obj instanceof Answer) {

Answer answer = (Answer) obj;

switch (index) {

case 0:

result += answer.getRelatedQuestion().getDescription();

break;

case 1:

result += answer.getAnsweredCorrectly() ? "Yes" : "No";

break;

}

}

return result;

}


What we are basically doing is that for the first colum of the table viewer, we are returning the title of the question and in the second column we are putting wether the user answered correctly or not.

Finally modify the method getColumnImage of the the ViewLabelProvider to the following:


public Image getColumnImage(Object obj, int index) {

if (index == 1) {

if (obj instanceof Answer) {

Answer answer = (Answer) obj;

if (answer.getAnsweredCorrectly()) {

return AbstractUIPlugin.imageDescriptorFromPlugin(

"TableViewerExample", "icons/correct.png")

.createImage();

} else {

return AbstractUIPlugin.imageDescriptorFromPlugin(

"TableViewerExample", "icons/wrong.png")

.createImage();

}

}

}

return null;

}


Here we are enriching our second column with some visual effects: if the answer was correct we display a nice correct icon otherwise we display a suitable wrong icon.

Also don’t forget to place nice correct.png and wrong.png icons in your icons folder.

Now launch this RCP application and voilà!!!

Final RCP app

Pretty simple!!!